Tanks Tutorial

Originally recorded at Unite Boston 2015, the Tanks tutorial series will teach you how to create a 2 player (one keyboard) shooter game. You’ll learn about simple game mechanics, integrating world and screen space UI, as well as game architecture and audio mixing.
Based on this tutorial, we demonstrate in these additional videos how to use GameRules to create this game. For each phase, you will have to follow the official training from Unity. For each script creation, follow the corresponding video below.
1. Scene Setup
Phase 1 teaches you how to set up the base scene using the provided assets. Once you have followed the Phase 1 Scene Setup tutorial, you can setup GameRules workspace and application.
Instructions:
Hi Everybody, welcome to this tutorial serie. We will demonstrate how to effectively use GameRules extension inside Unity and how it facilitates and speeds up Developers and Designers work.
Al these videos needs to be followed at same time than videos available at Unity website as we only demonstrate here the creation of the rules to generate needed scripts. So each time Tanks tutorial asks you to create a script, then you have to switch instead to GameRules and follow this tutorial instead.
First of all, once you have installed GameRules from the asset store, you need to create your workspace. In the window menu, click on GameRules Studio. GameRules Studio is the console to create rules and build your script through the rule assembly.
As there is no workspace yet, GameRules studio shows first this Application wizard. The application name has by default the name of the game from player settings. Here you will change this to Tanks.
And then click on Create Application.
This creation takes some time as it imports the Core package of rules which contains hundreds of rules to be reused in your game.
Choosing a correct application name is critical as it creates automatically a ruleset and root class based on this name. The Tanks class inherits from Core class.
As you can see a GameRulesWorkspace folder has been created. If you refresh it, this Editor folder contains a file named gamerules.sqlite which is actually the embedded database containing all rules. Never delete this file otherwise you loose all your work.
Well now this first tutorial is finished. Thank you for your attention.
2. Tank Creation & Control
Phase 2 teaches you how to add the tank artwork and components to let the player control the tank. You have to follow the Phase 2 Tank Creation & Control tutorial, until the TankMovement script creation at duration 20min35.
After that you can switch to the tutorial below to create it inside GameRules.
Instructions:
When watching video tutorial from Unity for this phase 2, stops at 20min45sec and do NOT attach the TankMovement script to the tank. You can optionally continue to watch the video till 22min35 to understand what you try to achieve with the and compare how rules can achieve easily what you are used to develop in Mono or Visual Studio.
Instead, you will create a TankMovement flow rule and all other related rules in GameRules and then will assemble it before attaching it to the Tank prefab.
First of all, you need to create a new class Tank under Tanks by right-clicking Tanks class under App tree navigation (left sidebar):
- class Tanks-Tank: this class contains all rules related to tank game object. This class has the same inheritance than Tanks.

Then, you create all properties that you need for TankMovement:
- Property playerNumber created under Tanks class of class int, with default value 1 and description “indicates which player number this game object is”. This property is created there as it will probably be reused by other rules not related to Tank game object. other properties are very specific to tank, so they are create under Tank class.
- speed is a property which already exists in Core class. but as the default value is different, you can save as it under Tank class and change the default value to 12f, so the rule resolution mechanism will take this copy instead of the property from Core during rule assembly.
- Property turnSpeed created under Tank class of class float, with default value 180f and description “rotation speed of the game object”
- Property movementAudio under Tank class of class AudioSource and description “audio source used for the movement of the tank”
- Property engineIdling under Tank class of class AudioClip and description “clip of the engine when idling”
- Property engineDriving under Tank class of class AudioClip and description “clip of the engine when driving”
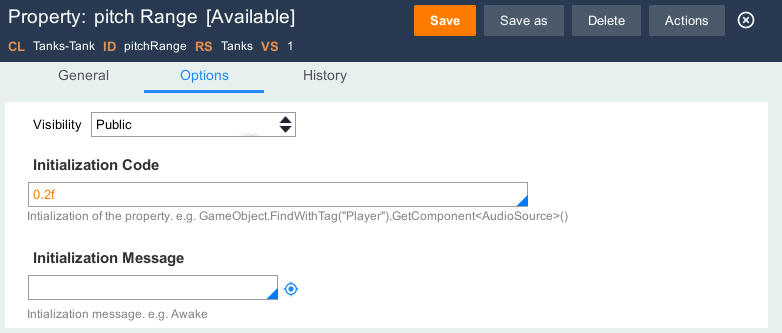
- Property pitchRange under Tank class of class float, with default value 0.2f and description “pitch adjusting value of the audio source when moving or idling”
Now lets create private properties that will not be visible in the inspector, but will be needed for Tank Movement:
- Property rigidbody already exists in Core class with correct initialization. So you don’t need to change it.
- Property movementAxisName in class Tank of class string with initialization “Vertical” + @playerNumber in message Start. By this way, the rule assembly will automatically bring playerNumber definition in the generated script.
- Property turnAxisName in class Tank of class string with initialization “Horizontal” + @playerNumber in message Start.
- Property originalPitch in class Tank of class float with initialization @movementAudio.pitch in message Start. By this way, the rule assembly will automatically bring movementAudio definition in the generated script.
- Property movementInputValue in class Tank of class float with initialization Input.GetAxis(@movementAxisName) in message Update. One again, the rule assembly mechanism will recursively brings definition and assemble also movementAxisName and playerNumber. You can check in View C# action menu the expected result if a Flow is using this property.
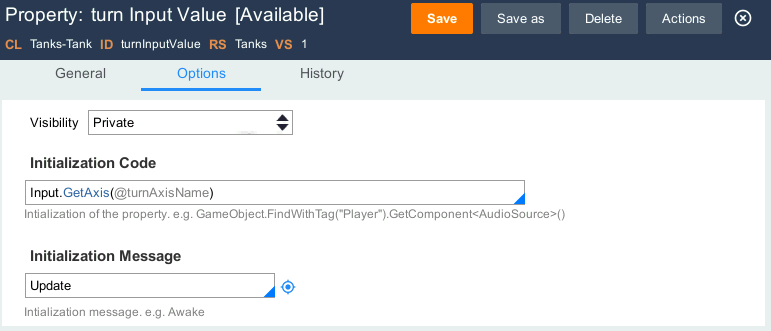
- Property turnInputValue in class Tank of class float with initialization Input.GetAxis(@turnAxisName) in message Update. One again, the rule assembly mechanism will recursively brings definition and assemble also turnAxisName and playerNumber. You can check in View C# action menu the expected result if a Flow is using this property.
Next step is to create the flow TankMovement:
- Flow TankMovement under Tank class with description “Tank movement”.
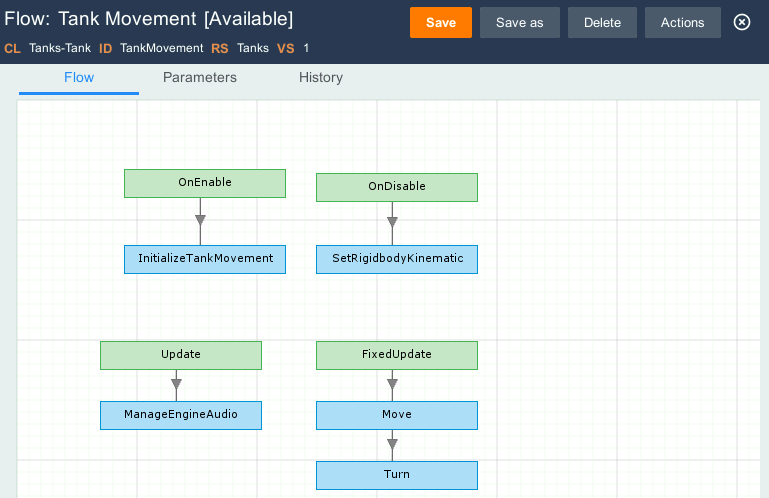
- Create a start state with message OnEnable
- Create a new logic state and connect it to the OnEnable state. The logic state call a logic rule named InitializeTankMovement. Create on open icon to create this logic rule.
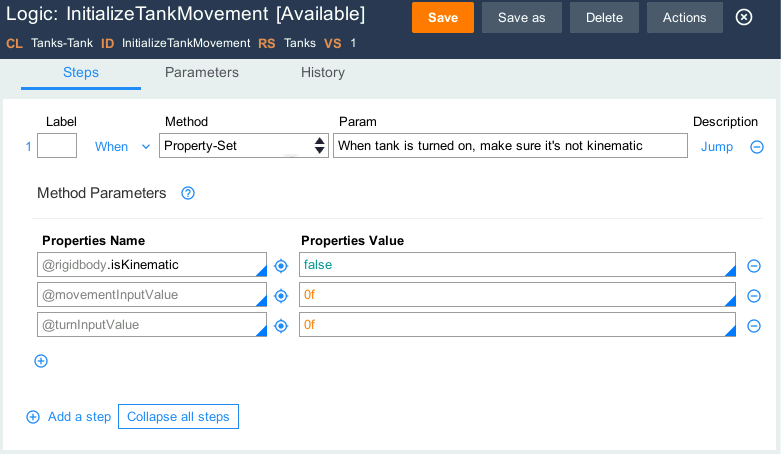
- Create logic rule InitializeTankMovement in class Tank with step:
- Property-Set, description ” When the tank is turned on, make sure it’s not kinematic.”
- @rigidbody.isKinematic = false
- @movementInputValue = 0f
- @turnInputValue = 0f
- Create a start state with message OnDisable
- Create a new logic state and connect it to the OnDisable state. The logic state call an existing logic rule named SetRigidbodyKinematic with input values:
- aRigidbody = rigidbody
- isKinematic = true

- Create a new start state with message Update.
- Create a new logic state and connect it to the Update state. The logic state call a logic rule named ManageEngineAudio. Create on open icon to create this logic rule.
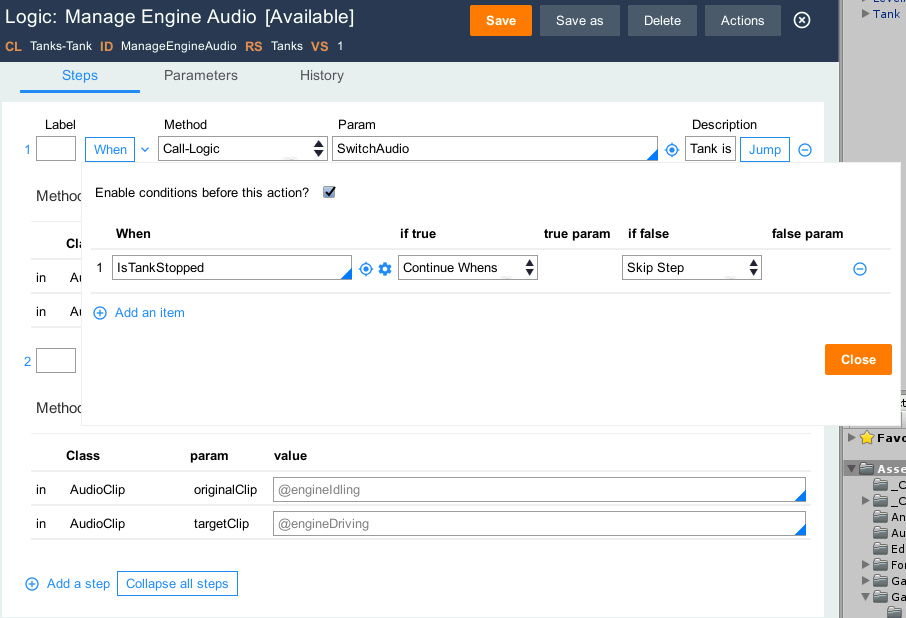
- Create logic rule ManageEngineAudio in class Tank with description “Play the correct audio clip based on wether or not the tank is moving and what audio is currently playing.” and steps:
- step 1:
- When first condition IsTankStopped, if true continue whens, if false skip step
- Call-Logic SwitchAudio with parameters:
- originalClip = @engineDriving
- targetClip = @engineIdling
- Jump condition true with if true end logic (to prevent step 2 from executing).
- step 2
- Call-Logic SwitchAudio with parameters:
- originalClip = @engineIdling
- targetClip = @engineDriving
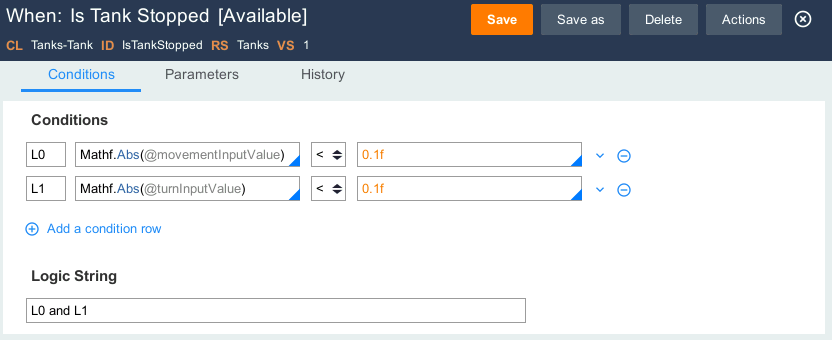
- Create a When IsTankStopped rule in class Tank:
- L0: Mathf.Abs (@movementInputValue) < 0.1f
- L1: Mathf.Abs (@turnInputValue) < 0.1f
- Condition logic: L0 and L1
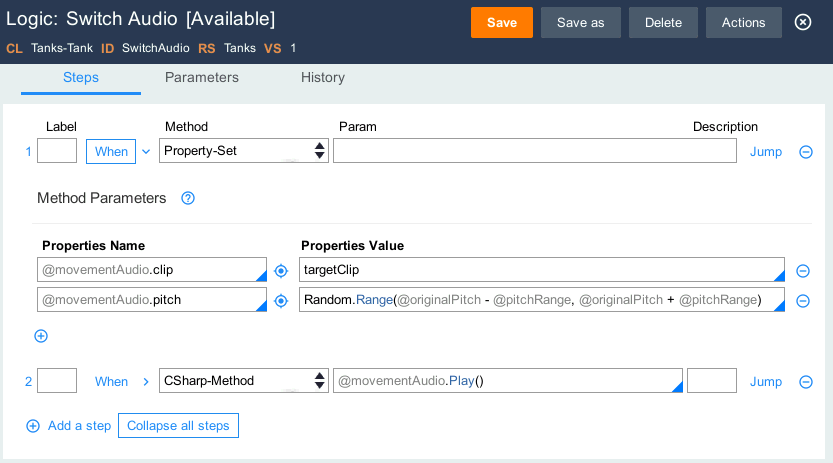
- Create a logic rule SwitchAudio in class Tank:
- input parameters
- AudioClip originalClip
- AudioClip targetClip
- step 1:
- When condition @movementAudio.clip == originalClip, if true continue whens, if false end logic.
- Property-Set
- @movementAudio.clip = targetClip
- @movementAudio.pitch = Random.Range(@originalPitch - @pitchRange, @originalPitch + @pitchRange)
- step 2:
- CSharp-Method @movementAudio.Play()
- Create a start state with message FixedUpdate
- Create a new logic state and connect it to the FixedUpdate state. The logic state call a logic rule named Move. Create on open icon to create this logic rule.
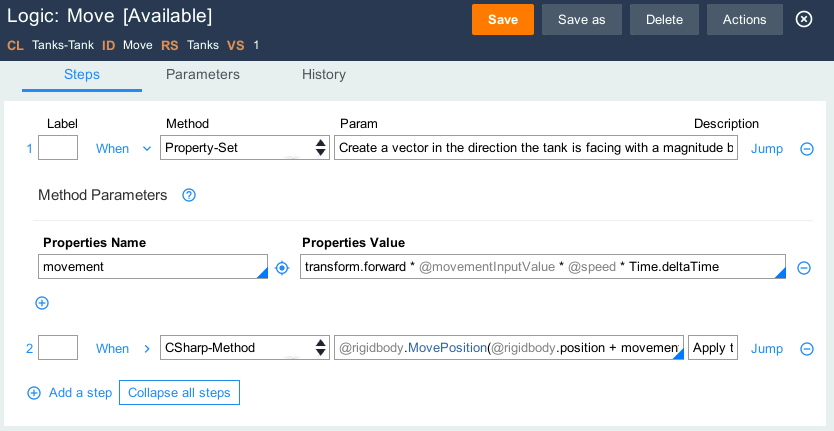
- Create logic rule Move in class Tank with description “Adjust the position of the tank based on the player’s input.”:
- Local variable Vector3 movement
- step 1 Property-Set description “Create a vector in the direction the tank is facing with a magnitude based on the input, speed and the time between frames.”
- movement = transform.forward * @movementInputValue * @speed * Time.deltaTime
- step 2 CSharp-Method description “Apply this movement to the rigidbody’s position.”
- @rigidbody.MovePosition(@rigidbody.position + movement)
- Create a new logic state and connect it to the Move state. The logic state call a logic rule named Turn. Create on open icon to create this logic rule.
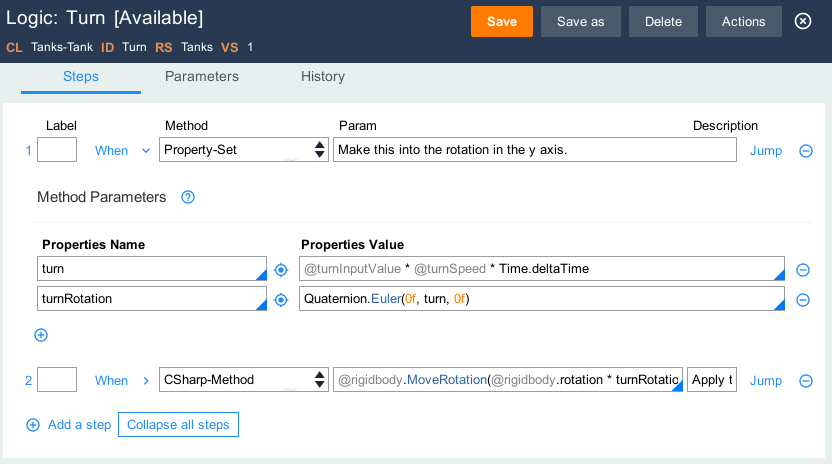
- Create logic rule Turn in class Tank with description “Adjust the position of the tank based on the player’s input.”:
- Local variable Quaternion turnRotation and float turn
- step 1 Property-Set description “Make this into a rotation in the y axis”.
- turn = @turnInputValue * @turnSpeed * Time.deltaTime
- turnRotation = Quaternion.Euler (0f, turn, 0f)
- step 2 CSharp-Method:
- @rigidbody.MoveRotation (@rigidbody.rotation * turnRotation)
Save everything. For the flow TankMovement, click on View C# action to have a preview of the generated C#. You will see how the rule assembly mechanism automatically brings properties and other rules as soon as they are used in the final script. All the rules created are reusable and easier to maintain as they all represent a small piece of functionality.
Click on Build Product on the top bar. The flow TankMovement has been automatically added to the current product rule upon creation. The build product button runs the rule assembly process. The generated script can be found under GameRulesWorkspace/scripts/Tanks/Tank/TankMovement_Tanks_Tank_RuleObjectFlow.cs.
Drag and drop it to the Tank game object in inspector and fill in public variables as described in tutorial video from Unity starting 58min15sec.

Then click on Play to test if the tank is moving correctly.
3. Camera Control
Phase 3 teaches you how to create a Camera which pans and zooms to keep all tanks onscreen at once.
You have to follow the Phase 3 Camera Control tutorial, until the Camera script creation at duration 8min18.
After that you can switch to the tutorial below to create it inside GameRules.
Instructions:
When watching video tutorial from Unity for this phase 3, stops at 8min18sec and do NOT attach the CameraControl script to the camera rig.
Instead, you will create a CameraControl flow rule and all other related rules in GameRules and then will assemble it before attaching it to the CameraRig game object.
First of all, you need to create a new class Camera under Tanks by right-clicking Tanks class under App tree navigation (left sidebar):
- class Tanks-Camera: this class contains all rules related to camera rig game object. This class has the same inheritance than Tanks.
Then, you create all properties that you need for CameraControl:
- Property dampTime created under Camera class of class float, with default value 0.2f and description “Approximate time for the camera to refocus”.
- Property screenEdgeBuffer created under Camera class of class float, with default value 4f and description “Space between the top/bottom most target and the screen edge”.
- Property minSize created under Camera class of class float, with default value 6.5f and description “The smallest orthographic size the camera can be”.
- Property targets created under Camera class of class Transform[] and description “All the targets the camera needs to encompass”.
Add these private properties as well that will not be visible in the inspector, but will be needed for CameraControl:
- camera is a property which already exists in Core class. but as the default value is different, you can save as it under Camera class and change the initialization code to GetComponentInChildren<Camera>(), so the rule resolution mechanism will take this copy instead of the property from Core during rule assembly.
- Property zoomSpeed created under Camera class of class float and description “Reference speed for the smooth damping of the orthographic size.”
- Property moveVelocity under Camera class of class Vector3 and description ” Reference velocity for the smooth damping of the position”
- Property desiredPosition under Camera class of class Vector3 and description “The position the camera is moving towards”
Next step is to create the flow CameraControl:
- Flow CameraControl under Camera class with description “Camera control”.
Then start creating Move and Zoom logic. Move logic reuse an existing logic FindAveragePosition:
- Create a start state with message FixedUpdate
- Create a new logic state and connect it to the FixedUpdate state. The logic state call a logic rule named Move. Create on open icon to create this logic rule.
- Create logic rule Move in class Camera with local variable Vector3 position and steps:
- Call-Logic: FindAveragePosition with inputs
- targets = @targets
- shouldBeActive = true
- averagePosition = position
- Property-Set, description “Set camera positon”
- position.y = transform.position.y
- @desiredPosition = position
- transform.position = Vector3.SmoothDamp(transform.position, @desiredPosition, ref @moveVelocity, @dampTime)
Create a logic Find Required Size to calculate the orthographic size of the camera:
- Create logic rule FindRequiredSize in class Camera with:
- local variables Vector3 desiredLocalPos
- input parameters:
- out float size
- step Property-Set with description “Find the position the camera rig is moving towards in its local space”.
- desiredLocalPos = transform.InverseTransformPoint(@desiredPosition)
- size = 0f
- step C-Sharp with description “Go through all the targets…”:
for (int i = 0; i < @targets.Length; i++)
{
        perform_FindRequiredSizeByTarget(@targets[i], desiredLocalPos, out size);
}
- Add logic rule FindRequiredSizeByTarget to the additional logic rules list in parameters tab to make sure this logic rule will be part of the rule assembly.
Create now sub logic rule FindRequiredSizeByTarget:
- Create logic rule FindRequiredSizeByTarget in class Camera with:
- local variables Vector3 targetLocalPos and Vector3 desiredPosToTarget
- input parameters:
- in Transform target
- in Vector3 desiredLocalPos
- out float size
- step Property-Set:
- size = 0f
- step Property-Set with when condition if target.gameObject.activeSelf, if true continuewhens, if false end logic
- targetLocalPos = transform.InverseTransformPoint(target.position)
- desiredPosToTarget = targetLocalPos - desiredLocalPos
- size = Mathf.Max(size, Mathf.Abs(desiredPosToTarget.y))
- size = Mathf.Max(size, Mathf.Abs(desiredPosToTarget.x) / @camera.aspect)
Come back to FindRequiredSize and finish its configuration:
- Reopen logic rule FindRequiredSize* in class Camera and add:
- step Property-Set with description “Add the edge buffer to the size and make sure the camera’s size isn’t below the minimum.”
- size = size + @screenEdgeBuffer
- size = Mathf.Max (size, @minSize)
Now come back to CameraControl flow and:
- Create a new logic state and connect it to the Move logic state. The logic state call a logic rule named Zoom. Create on open icon to create this logic rule.
- Create logic rule Zoom in class Camera with local variable float requiredSize and description “Find the required size based on the desired position and smoothly transition to that size.”:
- Call-Logic: FindRequiredSize with inputs and description
- out size = requiredSize
- Property-Set:
- @camera.orthographicSize = Mathf.SmoothDamp (@camera.orthographicSize, requiredSize, ref @zoomSpeed, @dampTime)
Now you will create a public method SetStartPositionAndSize that will be used later by the Game Manager class:
- Create a new message rule SetStartPositionAndSize under Camera class with:
- Type = Public Function
- Return type = void
- Message Name = SetStartPositionAndSize
- in Flow CameraControl, create a start state with message SetStartPositionAndSize
- Create a new logic state and connect it to the SetStartPositionAndSize start state. The logic state call a logic rule named SetStartPositionAndSize. Create on open icon to create this logic rule.
- Create logic rule SetStartPositionAndSize in class Camera with local variable float size and:
- step Call-Logic FindAveragePosition with description “Find the desired position” and inputs:
- targets = @targets
- shouldBeActive = true
- out averagePosition = @desiredPosition
- step Property-Set with description “Set the camera’s position to the desired position without damping”:
- transform.position = @desiredPosition
- step Call-Logic FindRequiredSize with description “Find and set the required size of the camera.” and inputs:
- out size = size
- step Property-Set:
- @camera.orthographicSize = size
Click on Build Product on the top bar. The flow CameraControl has been automatically added to the current product rule upon creation. The build product button runs the rule assembly process. The generated script can be found under GameRulesWorkspace/scripts/Tanks/Camera/CameraControl_Tanks_Camera_RuleObjectFlow.cs.
Drag and drop it to the CameraRig game object in inspector and fill in public variable targets with Tank game object.Then start to play to test the camera control.
4. Tank Health
Phase 4 teaches you how to create and display the health of the tank.
You have to follow the Phase 4 Tank Health tutorial, until the UIDirectionControl script creation at duration 21min27.
After that you can switch to the tutorial below to create it inside GameRules.
Instructions:
When watching video tutorial from Unity for this phase 4, stops at 21min27sec and do NOT attach the UIDirectionControl script to the HealthSlider.
Instead, you will create a CameraControl flow rule and all other related rules in GameRules and then will assemble it before attaching it to the CameraRig game object.
First of all, you need to create a new class Camera under Tanks by right-clicking Tanks class under App tree navigation (left sidebar):
- class Tanks-UI: this class contains all rules related to UI. This class inherits from Core-UI (instead of Core like Tanks).
Then, you create all properties that you need for UIDirectionControl:
- Property useRelativeRotation created under UI class of class bool, with default value true.
- Property relativeRotation created under UI class of class Quaternion, type Private, with default value transform.parent.localRotation in message Start.
Next step is to create the flow UIDirectionControl:
- Flow UIDirectionControl under UI class.
- Create a start state with message Update
- Create a new logic state and connect it to the Update state. The logic state call a logic rule named SetUIDirectionControl. Create on open icon to create this logic rule.
- Create logic rule SetUIDirectionControl in class UI with steps:
- Property-Set, with when condition @useRelativeRotation, if true continue whens, if false skip step
- transform.rotation = @relativeRotation
Build the product and then attach the generated script UIDirectionControl_Tanks_UI_RuleObjFlow.cs to HealthSlider object. Now you can come back to the video at 23min00 and follow instructions till 26min10.
Next step is to create the flow TankHealth under Tank class and all related rules. Create following public properties:
- Property startingHealth created under Tank class of class float, with default value 100f and description “The amount of health each tank starts with”.
- Property slider created under Tank class of class Slider with description “The slider to represent how much health the tank currently has”.
- Property fillImage created under Tank class of class Image, with description ” The image component of the slider”.
- Property fullHealthColor created under Tank class of class Color with default value Color.green and description “The color the health bar will be when on full health”.
- Property zeroHealthColor created under Tank class of class Color with default value Color.red and description “The color the health bar will be when on no health”.
- Property explosionPrefab created under Tank class of class GameObject with description “A prefab that will be instantiated in Awake, then used whenever the tank dies”.
Then create these additional private properties under Tank class:
- Property currentHealth created under Tank class of class float, with default value @startingHealth in message OnEnable and description “How much health the tank currently has”.
- Property dead created under Tank class of class bool with default value false in message OnEnable and description “Has the tank been reduced beyond zero health yet?”.
- Property explosionParticles created under Tank class of class ParticleSystem with default value Instantiate (@explosionPrefab).GetComponent<ParticleSystem> () in message Awake and description “The particle system the will play when the tank is destroyed”.
- Property explosionAudio created under Tank class of class AudioSource with default value @explosionParticles.GetComponent<AudioSource> () in message Awake and description “The audio source to play when the tank explodes”. As you can see under View C#, there is a cascading initialization when referencing explosionParticles property.
Once done, let’s create TankHealth flow:
- Flow TankHealth under Tank class.
- Create a start state with message Awake
- Create a new logic state and connect it to the Awake state. The logic state call a logic rule named ActivateGameObject with parameters:
- aGameObject = @explosionParticles.gameObject
- activate = false
- recursive = false
- Create a start state with message OnEnable
- Create a new logic state and connect it to the OnEnable state. The logic state call a logic rule named SetHealthUI. Create on open icon to create this logic rule.
- Create logic rule SetHealthUI in class Tank with steps:
- Property-Set:
- @slider.value = @currentHealth
- @fillImage.color = Color.Lerp (@zeroHealthColor, @fullHealthColor, @currentHealth / @startingHealth)
Then let’s create the TakeDamage interface:
- Create a Message rule TakeDamage of type Public function, returning void, with input parameter float amount.
- Create a Logic rule SetDamage with:
- input parameter float damage
- step Property-Set:
- @currentHealth = @currentHealth - damage
- Create a when rule IsDead with:
- L0: @currentHealth <= 0f
- L1: !@dead
- Satisfaction logic = L0 and L1
- Create a Logic rule OnDeath with steps
- Property-Set with description “Move the instantiated explosion prefab to the tank’s position and turn it on”.
- @dead = true
- @explosionParticles.transform.position = transform.position
- Call-Logic: ActivateGameObject
- aGameObject = @explosionParticles.gameObject
- activate = true
- recursive = false
- CSharp-Method: @explosionParticles.Play() with description “Play the particle system of the tank exploding”.
- CSharp-Method: @explosionAudio.Play() with description “Play the tank explosion sound effect”.
- Call-Logic: ActivateGameObject with description “Turn the tank off”:
- aGameObject = gameObject
- activate = false
- recursive = false
- Then update TankHealth flow:
- Create a start state with message TakeDamage
- Create a new logic state and connect it to the TakeDamage state. The logic state call a logic rule named SetDamage.
- Create a new logic state and connect it to the SetDamage state. The logic state call a logic rule named SetHealthUI.
- Create a new decision state and connect it to the SetHealthUI state with name “Dead?”
- Create a new logic state and connect it to the decision state. The logic state call a logic rule named OnDeath.
- Click on the transition between the decision state and the OnDeath logic and setup When condition using rule IsDead and 10%.
Then build the product and attach the generated script TankHealth_Tanks_Tank_RuleObjectFlow.cs to Tank game object. Fill in public variables as described in the video, save the scene and play.
5. Shell Creation
Phase 5 teaches you how to create a Shell for the tank, creating a radius for explosion.
You have to follow the Phase 5 Shell Creation tutorial, until the ShellExplosion script creation at duration 8min30.
After that you can switch to the tutorial below to create it inside GameRules.
Instructions:
When watching video tutorial from Unity for this phase 5, stops at 8min30sec and do NOT attach the ShellExplosion script to the Shell game object.
Instead, you will create a CameraControl flow rule and all other related rules in GameRules and then will assemble it before attaching it to the CameraRig game object.
First of all, you need to create a new class Shell under Tanks by right-clicking Tanks class under App tree navigation (left sidebar):
- class Tanks-Shell: this class contains all rules related to Shell.
Then, you create all properties that you need for ShellExplosion:
- Property tankMask created under Tanks class of class LayerMask.
- Save as the property Tanks-Tank.explosionParticles to Tanks.explosionParticles and make it Public with no initialization.
- Save as the property Tanks-Tank.explosionAudio to Tanks.explosionAudio without modification. Delete old property in Tanks-Tank.
- Property maxDamage created under Shell class of class float with default value 100f and description “The amount of damage done if the explosion is centred on a tank”.
- Property explosionForce created under Shell class of class float with default value 1000f and description “The amount of force added to a tank at the centre of the explosion”.
- Property maxLifeTime created under Shell class of class float with value 2f and description “The time in seconds before the shell is removed”.
- Property explosionRadius created under Shell class of class float with value 5f and description “The maximum distance away from the explosion tanks can be and are still affected”.
Next step is to create the flow ShellExplosion:
- Flow ShellExplosion under Shell class.
- Create a start state with message Start
- Create a new logic state and connect it to the Start state. The logic state call a logic rule named DestroyGameObject with parameters:
- aGameObject = gameObject
- aDelay = @maxLifeTime
- detachChildren = false
- Create a start state with message OnTriggerEnter
- Create a new logic state and connect it to the OnTriggerEnter state. The logic state call a logic rule named ExplodeShell.
- Create logic rule ExplodeShell in class Shell with:
- Local variable Collider[] colliders
- Add logic rule DamageTank in additional logic rules under parameters tab.
- steps:
- Property-Set:
- colliders = Physics.OverlapSphere (transform.position, @explosionRadius, @tankMask);
- C-Sharp:
// Go through all the colliders...
for (int i = 0; i < colliders.Length; i++)
{
        perform_DamageTank(colliders[i].GetComponent<Rigidbody>());
}
Next steps:
- Property-Set with description “Unparent the particles from the shell”
- @explosionParticles.transform.parent = null
- CSharp-Method : @explosionParticles.Play() and description “Play the particle system”.
- CSharp-Method : @explosionAudio.Play() and description “Play the explosion sound effect”.
- Call-Logic rule named DestroyGameObject and description “Once the particles have finished, destroy the game object they are on”:
- aGameObject = @explosionParticles.gameObject
- aDelay = @explosionParticles.duration
- detachChildren = false
- Call-Logic rule named DestroyGameObject and description “Destroy the shell”.
- aGameObject = gameObject
- aDelay = 0f
- detachChildren = false
Now let’s create DamaTank logic:
- Create logic rule DamageTank in class Shell with:
- input parameter Rigidbody targetRigidbody
- local variable float damage
- Steps:
- Call-Logic with when condition targetRigidbody, if true continue whens, if false end logic, calling AddExplosionForce with input parameters:
- aRigidbody = targetRigidbody
- explosionForce = @explosionForce
- explosionPosition = transform.position
- explosionRadius = @explosionRadius
- Call Logic CalculateDamage and create this logic rule
- Create logic rule CalculateDamage in class Shell with:
- parameters:
- in Vector3 targetPosition,
- out float damage
- local variable Vector3 explosionToTarget, float explosionDistance, float relativeDistance
- Step Property-Set
- explosionToTarget = targetPosition - transform.position
- explosionDistance = explosionToTarget.magnitude
- relativeDistance = (@explosionRadius - explosionDistance) / @explosionRadius
- damage = relativeDistance * @maxDamage
- damage = Mathf.Max (0f, damage)
Come back to logic rule DamageTank and continue to fill in steps:
- steps:
- Call Logic CalculateDamage with input parameters:
- targetPosition = targetRigidbody.position
- damage = damage
- Call-Flow with parameters:
- Game Object = targetRigidbody.gameObject
- Class = Tanks-Tank
- Flow = TankHealth
- Message = TakeDamage
- amount = damage
Once done, save them all, build the product, and attach the generated script ShellExplosion_Tanks_Shell_RuleObjectFlow.cs to Shell game object. Specify public variables with missing particle system. Play the game.
6. Firing Shells
Phase 6 teaches you how to fire projectiles, and make a UI & Sound fx to accompany the mechanic.
You have to follow the Phase 6 Firing Shells tutorial, until the TankShooting script creation at duration 13min20.
After that you can switch to the tutorial below to create it inside GameRules.
Instructions:
When watching video tutorial from Unity for this phase 6, stops at 13min20sec and do NOT attach the TankShooting script to the Tank game object.
Instead, you will create a TankShooting state machine rule and all other related rules in GameRules and then will assemble it before attaching it to the Tank game object.
Caution
This tutorial will introduce State Machine rule. The generated code TankShooting will look very different from the script proposed by Unity.
You will reuse Tank class created during Phase 02.
Then, you create all properties that you need for TankShooting:
- Property shell created under Tank class of class Rigidbody with description “Prefab of the shell”.
- Property fireTransform created under Tank class of class Transform with description “A child of the tank where the shells are spawned”.
- Property aimSlider created under Tank class of class Slider with description “A child of the tank that displays the current launch force”.
- Property shootingAudio created under Tank class of class AudioSource with description “Reference to the audio source used to play the shooting audio. NB: different to the movement audio”.
- Property chargingClip created under Tank class of class AudioClip.
- Property firingClip created under Tank class of class AudioClip.
- Property minLaunchForce created under Tank class of class float and default value 15f.
- Property maxLaunchForce created under Tank class of class float and default value 30f.
- Property maxChargeTime created under Tank class of class float and default value 0.75f.
We need also additional few private properties:
- Property FireButton created under Tanks class of class string with default value “Fire” + @playerNumber in Start message with private visibility.
- Property currentLaunchForce created under Tank class of class float with private visibility.
- Property chargeSpeed created under Tank class of class float with private visibility and default value (@maxLaunchForce - @minLaunchForce) / @maxChargeTime in message Start.
As the slider always need to have same value than current launch force, the best is to create a logic rule for setting current launch force which will also automatically update aim slider value:
- Create logic rule SetCurrentLaunchForce in class Tank with:
- input parameter float force
- Step Property-Set:
- @currentLaunchForce = force
- @aimSlider.value = @currentLaunchForce
Next step is to create the state machine TankShooting:
- State Machine TankShooting under Tank class.
- Create three state machine states:
- Idle state
- Charging state
- Firing state
- In parameter tab, set default state = Idle, in message OnEnable.
Then, you will define what happens in Idle state. This state is doing almost nothing. However, each time the Tank enters in this state, you have to reset the current launch force to its minimum value. It is the same thing also at startup of the game. So, you just have to call logic rule SetCurrentLaunchForce when entering Idle state, this will be called also at initialization during OnEnable:
- For Idle state, when entering state, call SetCurrentLaunchForce with parameters:
- force = @minLaunchForce
The tank moves from Idle to Charging as soon as the Fire button is pressed down. You have to create a transition between Idle and Charging and setup a condition IsFireButtonDown tested during Update message:
- Create a transition from Idle to Charging, with transition condition:
- message = Update
- When = IsFireButtonDown
- Logic = leave it blank, there is no particular action to perform there.
- Create a when rule IsFireButtonDown under Tanks class with:
- L0 Input.GetButtonDown(@FireButton)
- Logic string = L0
Now that the tank is in Charging, when it enters in this state, we want to play the charging clip:
- For Charging state, when entering state, call PlayAudioClip with parameters:
- audioSource = @shootingAudio
- audioClip = @chargingClip
Then, for each Update message, you have to increment the value of currentLaunchForce:
- For Charging state, add static logic rule:
- message = Update
- logic = SetCurrentLaunchForce with parameter:
- force = @currentLaunchForce + @chargeSpeed * Time.deltaTime
So now, that the current launch force keeps updated when the tank is in charging state, you can setup the transition between Charging and Firing state. First condition is when the Fire button is released. Another condition is when the lauch force is at maximum value:
- Create a transition from Charging to Firing, with transition condition:
- message = Update
- When = IsFireButtonUp
- Logic = leave it blank.
- Create a when rule IsFireButtonUp under Tanks class with:
- L0 Input.GetButtonUp(@FireButton)
- Logic string = L0
- Add a condition to the transition from Charging to Firing:
- message = Update
- When = IsCurrentLaunchForceAtMax
- Logic = SetCurrentLaunchForce with parameter (this logic rule will ONLY execute one time if this transition condition applies):
- force = @maxLaunchForce
- Create a when rule IsCurrentLaunchForceAtMax under Tank class with:
- L0 @currentLaunchForce >= @maxLaunchForce
- Logic string = L0
When you are in the Firing state, it is now time to fire the shell. As this action has to be performed only once, you call it when entering state:
- For Firing state, when entering state, call FireShell.
- Create logic rule FireShell in class Tank with:
- local variable Rigidbody shellInstance
- Step Property-Set:
- shellInstance = Instantiate (@shell, @fireTransform.position, @fireTransform.rotation) as Rigidbody
- shellInstance.velocity = @currentLaunchForce * @fireTransform.forward
- Call-Logic PlayAudioClip with parameters:
- audioSource = @shootingAudio
- audioClip = @firingClip
Finally, when the tank is in Firing mode, it has to switch immediately to Idle state, as it has already fired the shell when entering the Firing state:
- Create a transition from Firing to Idle, with transition condition:
- message = Update
- When = Always
- Logic = leave it blank.
Now, you can save and build the product. Once assembled, attach the script TankShooting_Tanks_Tank_RuleObjectStateMachine to the Tank game object. Fill in different public variables as indicated at the end of the Unity Phase 06 tutorial and play the game.
7. Game Managers
Phase 7 teaches you all about the architecture of the game - the tank and game managers which handle creating the rounds and deciding the winner of the game. We also learn about coroutines and how they are used in scenarios like this.
You have to follow the Phase 7 Game Managers tutorial, until the GameManagers script creation at duration 12min50.
After that you can switch to the tutorial below to create it inside GameRules.
Instructions:
When watching video tutorial from Unity for this phase 7, stops at 12min50sec with the empty GameManager game object.
First of all, you need to create a new class Managers under Tanks by right-clicking Tanks class under App tree navigation (left sidebar):
- class Tanks-Managers: this class contains all rules related to managers.
Then, you create all properties that you need for TankManager:
- Property TankPrefab created under Managers class of class GameObject.
- Property spawnPoint already exists in Core class, so we don’t need to recreate it.
- Property TankInstance created under Managers class of class GameObject with Public & Hide in inspector option.
- Property playerColor created under Managers class of class Color.
- Property coloredPlayerText created under Managers class of class string with Public & Hide in inspector option.
- Property canvasGameObject created under Managers class of class GameObject with Private option.
- Property wins created under Managers class of class int with value 0 and with Public & Hide in inspector option.
Next step is to create the flow TankManager:
- Flow TankManager under Managers class
- in parameters tab, blank Extension value and check Is Class Serializable.
- Create a start state with message Setup
- Create the Setup message as a public function returning void and with parameter int playerNumber.
- In flow TankManager, create a new logic state and connect it to the Setup state. The logic state call a logic rule named Setup with parameters:
- int playerNumber = playerNumber
Create the logic rule Setup with:
- input parameter int playerNumber
- local variable MeshRenderer[] renderers
- Call-logic CreateGameObject:
- GameObject aPrefab = @TankPrefab
- Transform spawnPoint = @spawnPoint
- out GameObject newGameObject = @TankInstance
- Call-Flow with description set player number to TankMovement
- GameObject = @TankInstance
- Class = Tanks-Tank, Flow = TankMovement
- Property = playerNumber
- Value = playerNumber
- Call-Flow with description set player number to TankShooting
- GameObject = @TankInstance
- Class = Tanks-Tank, Flow = TankShooting
- Property = playerNumber
- Value = playerNumber
- Property-Set with description set colored player text
- renderers = @TankInstance.GetComponentsInChildren<MeshRenderer>()
- @ColoredPlayerText = “<” + “color=#” + ColorUtility.ToHtmlStringRGB(@playerColor) + “>PLAYER ” + playerNumber + “<” + “/color>”
- @canvasGameObject = @TankInstance.GetComponentInChildren<Canvas>().gameObject
- Loop for int i = 0; i < renderers.Length; i++, Property-Set:
- renderers[i].material.color = @playerColor
Go back to Tank manager flow:
- Create a start state with message EnableControl
- Create the EnableControl message as a public function returning void.
- In flow TankManager, create a new logic state and connect it to the EnableControl state. The logic state call a logic rule named SetupControl with parameters:
- bool enable = true
Create the logic rule SetupControl with:
- input parameter bool enable
- Call-Flow with description enable TankMovement
- GameObject = @TankInstance
- Class = Tanks-Tank, Flow = TankMovement
- Property = enabled
- Value = enable
- Call-Flow with description enable TankShooting
- GameObject = @TankInstance
- Class = Tanks-Tank, Flow = TankShooting
- Property = enabled
- Value = enable
- CSharp-Method with description activate canvas
- @canvasGameObject.SetActive(enable)
Go back to TankManager flow:
- Create a start state with message DisableControl
- Create the DisableControl message as a public function returning void.
- In flow TankManager, create a new logic state and connect it to the DisableControl state. The logic state call a logic rule named SetupControl with parameters:
- bool enable = false
Now we create Reset in TankManager flow:
- Create a start state with message Reset
- Create the Reset message as a public function returning void.
- In flow TankManager, create a new logic state and connect it to the Reset state. The logic state call a logic rule named Reset.
Create the logic rule Reset with:
- Property-Set with description reset position
- @TankInstance.transform.position = @spawnPoint.position
- @TankInstance.transform.rotation = @spawnPoint.rotation
- CSharp-Method with description “deactivate tank”
- @TankInstance.SetActive(false)
- CSharp-Method with description “reactivate tank”
- @TankInstance.SetActive(true)
Go back to TankManager flow:
- Create a start state with message WinRound
- Create the WinRound message as a public function returning void.
- In flow TankManager, create a new logic state and connect it to the WinRound state. The logic state call a logic rule named IncreaseWins.
Create the logic rule IncreaseWins with:
- Property-Set with description increase wins
- @wins = @wins + 1
Now that Tank Manager is finished. Build the product so the TankManager class is generated and can be reused as property class to interact with.
Once product build is done, let’s create GameManager flow.
First you need to create properties:
- Property TankManagers created under Managers class of class TankManager_Tanks_Managers_RuleObjectFlow[].
- Property tankRoundWinner created under Managers class of class TankManager_Tanks_Managers_RuleObjectFlow with Private option.
- Property tankGameWinner created under Managers class of class TankManager_Tanks_Managers_RuleObjectFlow with Private option.
- Property messageText created under Managers class of class Text.
- Property numRoundsToWin created under Managers class of class int with default value 5.
- Property roundNumber created under Managers class of class int with Private option and default value 0.
- Property numTankLeft created under Managers class of class int with value 0 and with Private option.
- Property startDelay created under Managers class of class float and default value 3f.
- Property startWait created under Managers class of class WaitForSeconds with value new WaitForSeconds (@startDelay) in message Start and with Private option.
- Property endDelay created under Managers class of class float and default value 3f.
- Property endWait created under Managers class of class WaitForSeconds with value new WaitForSeconds (@endDelay) in message Start and with Private option.
- Property cameraControl created under Managers class of class GameObject.
Now create new flow GameManager:
- Flow GameManager under Managers class
- Create a start state with message Start
- Create a new logic state and connect it to the Start state. The logic state call a logic rule named SpawnAllTanks.
Create the logic rule SpawnAllTanks with:
- Loop for int i = 0; i < @TankManagers.Length; i++
- CSharp-Method with parameter @TankManagers[i].Setup(i + 1)
Go back to flow GameManager:
- Create a new logic state and connect it to the SpawnAllTanks state. The logic state call a logic rule named SetCameraTargets.
Create the logic rule SetCameraTargets with:
- local variable Transform[] targets
- Property-Set
- targets = new Transform[@TankManagers.Length]
- Loop for int i = 0; i < targets.Length; i++, call Property-Set:
- targets[i] = @TankManagers[i].TankInstance.transform
- Call-Flow:
- Game Object = @cameraControl
- Class = Tanks-Camera
- Flow = CameraControl
- property = targets
- value = targets
Go back to flow GameManager:
- Create a new logic state and connect it to the SetCameraTargets state. The logic state call a logic rule named GameLoop.
Create the logic rule GameLoop with:
- In parameters tab, change logic type to Coroutine. Automatically, the flow GameManager will adapt the call to GameLoop by doing a StartCoroutine.
- Call-Logic RoundStarting
Create the logic rule RoundStarting with:
- In parameters tab, change logic type to Coroutine.
- Call-Logic ResetAllTanks
- Call-Logic DisableTankControl
Create the logic rule ResetAllTanks with:
- Loop int i = 0; i < @TankManagers.Length; i++, CSharp-Method:
- @TankManagers[i].Reset()
Create the logic rule DisableTankControl with:
- Loop int i = 0; i < @TankManagers.Length; i++, CSharp-Method:
- @TankManagers[i].DisableControl()
Go back to RoundStarting and continue with:
- Call-Flow
- Game Object = @cameraControl
- Class = Tanks-Camera
- Flow = CameraControl
- Public Function = SetStartPositionAndSize
- Property-Set:
- @roundNumber = @roundNumber + 1
- @messageText.text = “ROUND ” + @roundNumber
- Yield return @startWait
Go back to the logic rule GameLoop and continue with:
- Call-Logic RoundPlaying
Create the logic rule RoundPlaying with:
- In parameters tab, change logic type to Coroutine.
- Call-Logic EnableTankControl
Create the logic rule EnableTankControl with:
- Loop int i = 0; i < @TankManagers.Length; i++, CSharp-Method:
- @TankManagers[i].EnableControl()
Go back to RoundPlaying and continue with:
- Property-Set:
- @messageText.text = string.Empty
- While MoreThanOneTankLeft, Yield return null
Create the when rule MoreThanOneTankLeft:
- L0 : @numTankLeft > 1
- Logic string = L0
- Preprocessing logic = CalculateNumTankLeft
Create the logic rule CalculateNumTankLeft with:
- Property-Set
- @numTankLeft = 0
- Loop Foreach TankManager_Tanks_Managers_RuleObjectFlow tank in @TankManagers
- sub-step When tank.TankInstance.activeSelf, it true continue whens, if false skip step, Property-Set:
- @numTankLeft = @numTankLeft + 1
Go back to the logic rule GameLoop and continue with:
- Call-Logic RoundEnding
Create the logic rule RoundEnding with:
- In parameters tab, change logic type to Coroutine.
- local variable string endMessage
- Call-Logic DisableTankControl
- Property-Set:
- @tankRoundWinner = null
- Call-Logic GetRoundWinner
Create the logic rule GetRoundWinner with:
- parameter out TankManager_Tanks_Managers_RuleObjectFlow winner
- Property-Set
- winner = null
- Loop foreach TankManager_Tanks_Managers_RuleObjectFlow tank in @TankManagers
- sub-step When IsGameObjectActive with aGameObject = tank.TankInstance, if true continue whens, if false skip step, Property-Set
- winner = tank
- jump true , if true exit iteration
Go back to the logic rule RoundEnding and continue:
- Call-Logic GetRoundWinner, with parameter:
- out winner = @tankRoundWinner
- When @tankRoundWinner != null, if true continue whens, if false skip step, CSharp-Method:
- @tankRoundWinner.WinRound()
- When IsRoundWinnerGameWinner, if true continue whens, if false skip step, Property-Set:
- @tankGameWinner = @tankRoundWinner
Create the when rule IsRoundWinnerGameWinner:
- L0 @tankRoundWinner != null
- L1 @tankRoundWinner.wins >= @numRoundsToWin
- Logic string: L0 and L1
Go back to the logic rule RoundEnding and continue:
- Call-Logic EndMessage
Create the logic rule EndMessage with:
- parameter out string message
- Property-Set
- message = “DRAW!”
- When @tankRoundWinner != null, if true continue whens, if false skip step, Property-Set:
- message = @tankRoundWinner.ColoredPlayerText + ” WINS THE ROUND!”
- Property-Set:
- message = message + “nnnn”
- Loop foreach TankManager_Tanks_Managers_RuleObjectFlow tank in @TankManagers, Property-Set:
- message = message + tank.ColoredPlayerText + “: ” + tank.wins + ” WINSn”
- When @tankGameWinner != null, if true continue whens, if false skip step, Property-Set:
- message = @tankGameWinner.ColoredPlayerText + ” WINS THE GAME!”
Go back to the logic rule RoundEnding and continue:
- Call-Logic EndMessage, with parameter:
- out message = endMessage
- Property-Set:
- @messageText.text = endMessage
- Yield return @endWait
Finally, go back to GameLoop and continue:
- When @tankGameWinner != null, if true continue whens, if false skip step, CSharp-Method:
- Application.LoadLevel(Application.loadedLevel)
- When @tankGameWinner == null, if true continue whens, if false skip step, CSharp-Method:
- StartCoroutine(perform_GameLoop())
Now that game loop is finished, save all opened rules and click on build. Once rule assembly has generated managers scripts, attach GameManager_Tanks_Managers_RuleObjectFlow to the empty game object GameManager, and fill-in inspector values:
- Tanks Managers size = 2
- Element 0:
- Tank Prefab = Tank
- Spawn Point = spawnPoint1
- Player Color = Color(17, 167, 245)
- Element 1:
- Tank Prefab = Tank
- Spawn Point = spawnPoint2
- Player Color = Color(248, 13, 33)
- Camera Control = CameraRig
- Message Text = Text (from MessageCanvas)
- Start Delay = 3
- Num Rounds to Win = 5
- End Delay = 3
Once done, click play to enjoy the game.